Rendering .vox Files

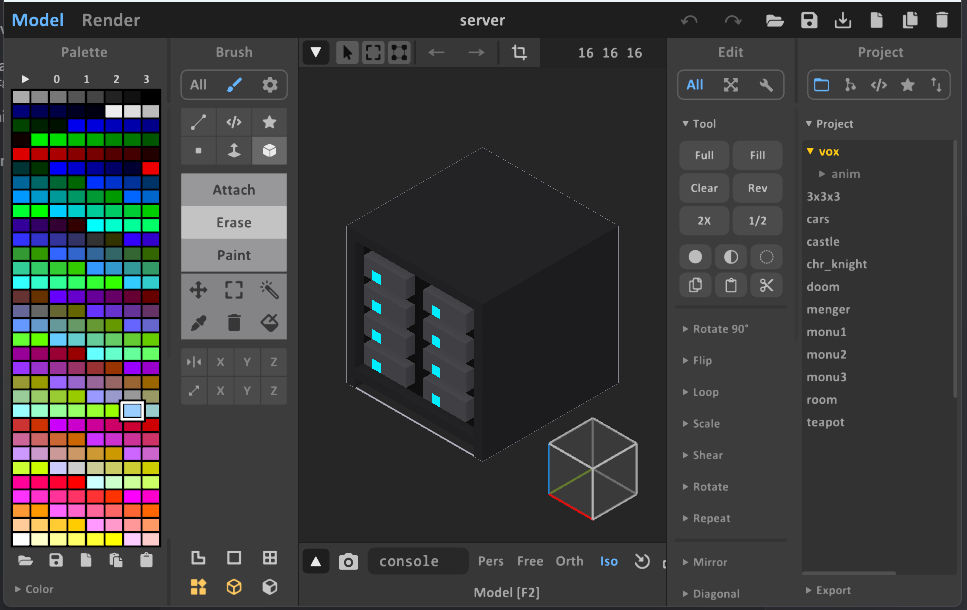
MagicaVoxel
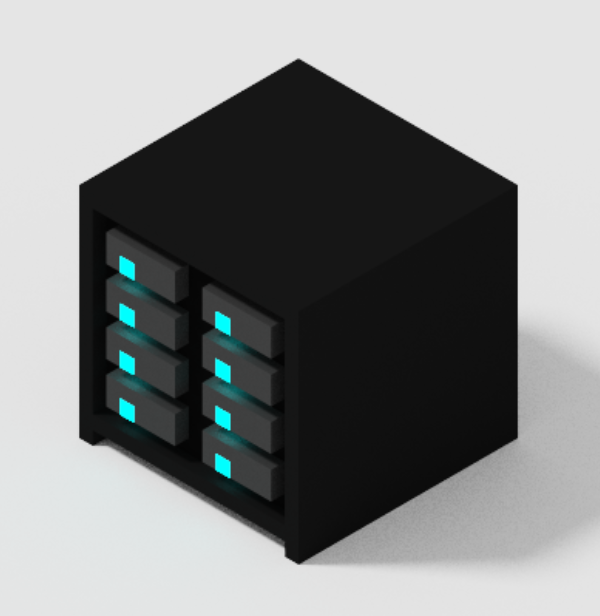
I recently stumbled upon the free voxel tool which lets you create and render 3d voxel models like this:
At the time, I was experimenting with an isometric-perspective game and considering creating 3D voxel models, which I would then render as 2D PNGs. MagicaVoxel seemed like the perfect tool for the job, since it has a built-in isometric view.
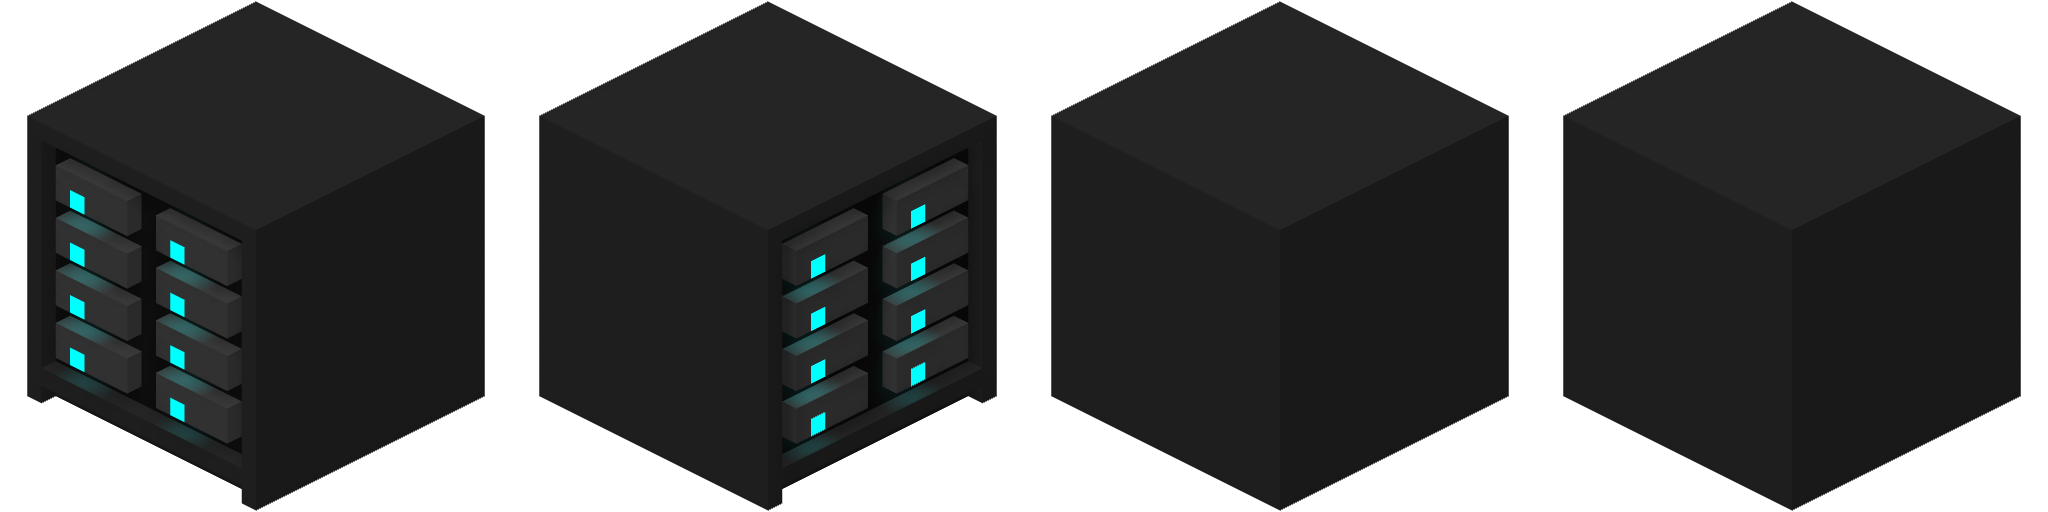
The renderer uses raycasting, resulting in proper shading and reflection. There is also a 'turntable' mode where you can instruct it to render four images, one from each side, which is useful if the object is rotatable in the 2D game.
While all this is great, I thought it would be fun to automate the rendering process somehow, as MagicaVoxel does not provide a clean workflow, in my opinion.
- Due to the high quality, rendering takes a long time depending on the image size and render detail, and this has to be done four times!
- The render settings are saved with the model, which means I have to copy them to each new model manually, or copy and modify the file.
- Exporting to .obj means everytime I edit a model I have to hit export and move the obj files into my game project
- If I ever decide to change the asset size or any of the render settings, I have to reopen each model, change the settings, and re-render it manually for each file. Manually, for each file.
So the goal is to just have the .vox files in the game project which I can edit and save anytime and the 2d assets are generated automatically
Three.js
I had worked with three.js before, so I searched online and was happy to see that the library already includes a .vox loader, which is great!
So I set up a quick demo and hit the first snag. "THREE.VOXLoader: Invalid VOX file. Unsupported version: 200"
if (version !== 150) {
  console.error('THREE.VOXLoader: Invalid VOX file. Unsupported version:', version);
  return;
}
It seems like MagicaVoxel updated its VOX file version but did not document anywhere what has changed since version 150
So for my first test I changed the byte that sets the vox version to 150 to trick the loader into accepting my file
function getVoxUrlMeshes(src) {
    return new Promise((resolve, reject) => {
        const loader = new VOXLoader();

        loader.load(src, (chunks) => {
            let meshes = chunks.map(c => new VOXMesh(c));
            resolve(meshes);
        }, () => { }, reject);
    });
}

export async function fakeVersionLoader(url) {
    const res = await fetch(url);
    const buffer = await res.arrayBuffer();

    const data = new DataView(buffer);
    data.setUint32(4, 150, true);

    const blob = new Blob([buffer]);
    const dataurl = URL.createObjectURL(blob);

    return await getVoxUrlMeshes(dataurl);
}
The threejs rendering was quite simple too using some lights and an OrthographicCamera
import * as THREE from 'three';
import { fakeVersionLoader } from './vox.js';

const SIZE = 512;

const scene = new THREE.Scene();
const renderer = new THREE.WebGLRenderer({
    alpha: true,
    antialias: true
});
renderer.setSize(SIZE, SIZE);
document.body.appendChild(renderer.domElement);

const d = 2;
const camera = new THREE.OrthographicCamera(1 / -d, 1 / d, 1 / d, 1 / -d, 1, 1000);

// Isometric angle (approx 35.264° X, 45° Y)
const radius = 100;
const isoAngle = THREE.MathUtils.degToRad(35.264);
const angle = THREE.MathUtils.degToRad(45);
camera.position.set(
    radius * Math.cos(angle),
    radius * Math.sin(isoAngle),
    radius * Math.sin(angle)
);

camera.lookAt(0, 0, 0);

fakeVersionLoader("/server.vox").then(meshes => {
    meshes.forEach(m => {
        let size = 0.0395;
        m.scale.setScalar(size);

        scene.add(m);

        const box3 = new THREE.Box3().setFromObject(m)
        const vector = new THREE.Vector3();
        box3.getCenter(vector);
        m.position.set(-vector.x, -vector.y, -vector.z);
    })
})

const hemiLight = new THREE.HemisphereLight(0xcccccc, 0x444444, 3);
scene.add(hemiLight);

const dirLight = new THREE.DirectionalLight(0xffffff, 2.5);
dirLight.position.set(1.5, 3, 2.5);
scene.add(dirLight);

const dirLight2 = new THREE.DirectionalLight(0xffffff, 1.5);
dirLight2.position.set(- 1.5, - 3, - 2.5);
scene.add(dirLight2);

function animate() {
    renderer.render(scene, camera);
}
renderer.setAnimationLoop(animate);
Orthographic means that an object always has the same size no matter how far away from the camera, that is the reason I had to scale down the model by quite a bit until it fit perfectly in my desired 512x512 canvas size.

This left me with an instant render of my model, downloadable by rightclick saving the canvas.
Finishing Touches
Next up I activated shadows, the difference is very subtle but noticeable.
renderer.shadowMap.enabled = true;
renderer.shadowMap.type = THREE.PCFSoftShadowMap;
...
m.castShadow = true;
m.receiveShadow = true;
...
dirLight.castShadow = true;
...
dirLight2.castShadow = true;
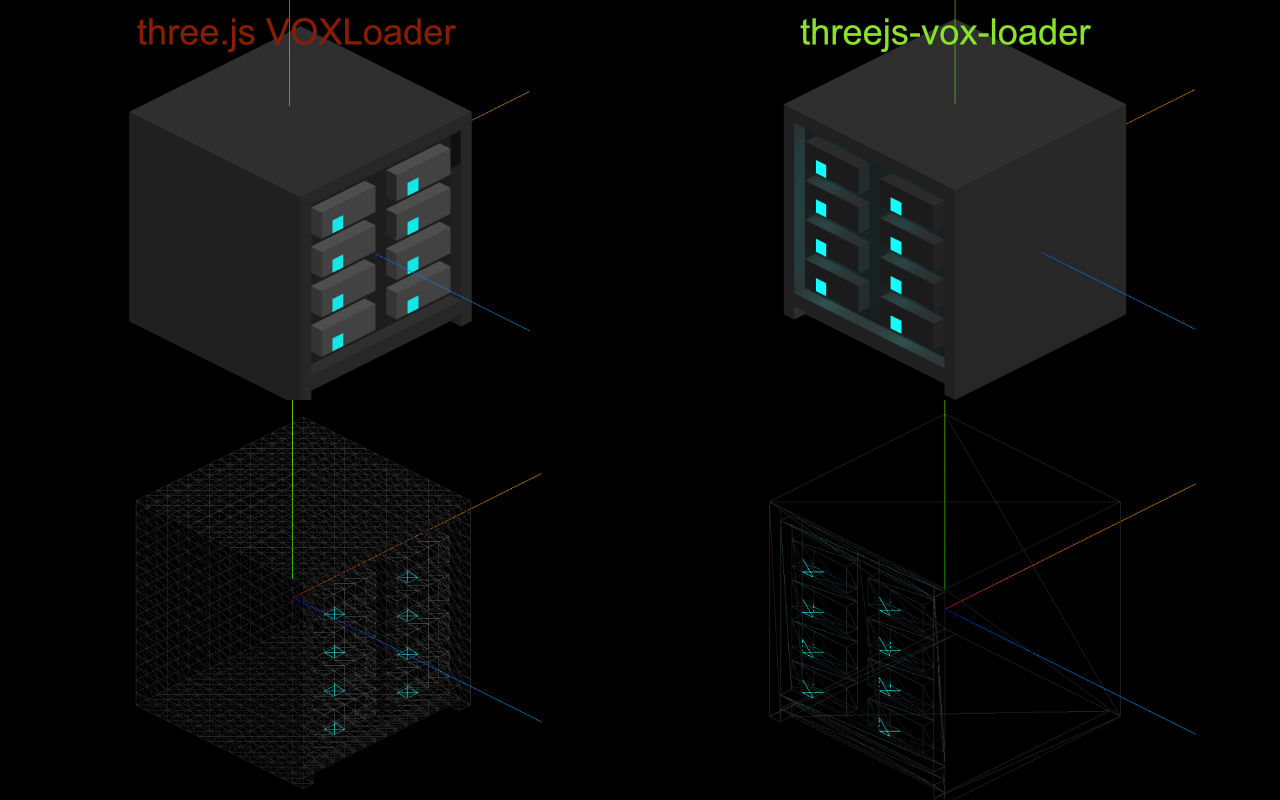
After that, I found out that the material information that can be set in MagicaVoxel is saved in the file, but is ignored by the reader. In the tool, you can select the roughness and emissiveness of a color/material. This left me with only one option:

So I wrote my own voxel loader which transfers the material data to the mesh material.
This and a little turntable logic lead to the asset:
I can now simply generate it right away by supplying the .vox file. I also have the option to automate it further using a Node.js filewatcher.
Optimizing the Mesh
I was able to greatly optimize the amount of vertices used by the mesh:
This is not really necessary for my usecase since I just want 4 static renders but for someone who wants to use it in a real-time application the performance matters.
The logic basically works like this:
- Approach the object from all 6 sides, for example "towards positive X"
- In each step, take a slice of the object (a Y Z slice for positive X)
- check each voxel of the slice - if the voxel of the previous slice is empty, add a face to a 2d array specific for the slice
- optimize the 2d array using rectangle decomposition which outputs a set of bigger rectangles
- for each of those rectangles, create a face
This way the "empty" topside of my example object consists of 1 face (2 triangles = 6 vertices) instead of 16*16 faces (512 Triangles = 1536 vertices). A reduction of 99.6094%
Now available as npm package with some more improvements: