
Training a custom Piper TTS Voice

There are a few TTS tools out there, and in recent years, more and more AI-based ones have been released. In my opinion, the best tool for voice cloning is Voicebox; it can be installed from GitHub and runs on Windows, working out of the box (pun intended). Under the hood, it uses Qwen TTS 1.7B, which offers zero-shot voice cloning.
Zero-shot means you supply a voice sample, and it can instantly generate audio for any given text based on that sample without being trained on that voice. The major drawback, of course, is that it needs enough resources to run:
- The model file itself is 4.23GB in size.
- You need a GPU with enough VRAM to fit the model.
- Even with a good GPU, voice generation isn’t real-time.
I want to use TTS for Home Assistant, for example, but I do not have a spare GPU lying around that is capable enough for this kind of thing and I don't want to leave my main PC running all the time. The go-to TTS solution for Home Assistant is Piper TTS. Compared to Voicebox, Piper has been around longer. There are some free pre-trained voice models available, but most of them aren’t high quality and simply do not generate nice-sounding audio. The best german one is Thorsten-Voice, which has been trained with over 12,000 voice samples.
Piper TTS runs on very limited hardware, and the model files are only a few MB.
Training a custom voice in Piper
The official rhasspy/piper project offers a tutorial and Thorsten Müller (from Thorsten Voice) made a nice youtube tutorial.
The project has been moved to OHF-Voice/piper1-gpl which also has a TRAINING.md but I was not able to get it running so I sticked to the old one.
And at this point it is time for a rant.
I hate python.
I f*cking hate python. I HATE IT.

Just the syntax alone is terrible.. Who creates a programming language where whitespace controls how the code runs? But that is not what was driving me nuts when working with Piper - it is the absolutely abysmal piece of sh*t dependency hell.
Every time I want to try out any python project, it stops working at "pip install" because either:
A) the version of Python I have installed is too new for the project, but the project does not state anywhere what version of Python it needs. Installing two versions of Python is not really possible, of course, so you need some third party tool called pyenv.
B) The packages the project needs are often not locked to a specific version, so it simply installs the newest version of each package, which then, OF COURSE, doesn't work anymore!
C) The project needs PyTorch, which needs a bazillion gigabytes of Nvidia packages downloaded, which download at a speed of like 1 KB/s, no matter how good your internet speed is, and there is a 50% chance that version of Torch simply does not run on your hardware because of the moon phase.
Random error messages that give you no clue whatsoever as to what the reason for the error is. But if you Google it, there's an 80% chance that someone on GitHub has the same bug on some random other Python project, and the solution, in 99% of cases, is, "Oh, simply downgrade package XYZ to version 0.0.0.01-dev-alpha."
If you perform enough arcane witchcraft to actually run the script, it spams the console with warnings. I have not come across a Python app that does not scream at me with lots of deprecation warnings while running.
Additionally, Python just installs packages to some random location globally on your system? Like, wow, thanks for spreading trash all over the place, where I will never find it or be able to clean it up. To prevent that, you have to create a virtual environment (venv).
I tried dockerizing the project but idk while running pip install it downloads all packages but then gets stuck at NOT downloading pytorch.
[/rant]

Getting piper running
I was able to install it like this:
git clone https://github.com/rhasspy/piper
cd piper/src/python

pyenv local 3.11.15
python3 -m venv .venv
source .venv/bin/activate

pip3 install pip==24.0
pip3 install --upgrade wheel setuptools
pip3 install -e .

./build_monotonic_align.sh

sudo apt-get install espeak-ng
Installing piper with dependencies
As you can see I had to switch to python 3.11 using pyenv and lock pip to 24.0.
Before diving too much into the dataset for my custom voice I decided to use the dataset provided by Thorsten https://www.thorsten-voice.de/en/datasets-2/. I will go into the details about how to create a custom dataset later in this post.
wget -O dataset.zip https://zenodo.org/records/7265581/files/ThorstenVoice-Dataset_2022.10.zip?download=1
unzip dataset.zip
rm -rf __MACOSX
mv ThorstenVoice-Dataset_2022.10/ dataset
mv dataset/metadata_test.csv dataset/metadata.csv
Download the dataset and use test.csv
It contains multiple csvs, but I use the test one which only includes some lines which is enough for .. well.. testing.
Next, the dataset has to be preprocessed:
python3 -m piper_train.preprocess \
  --language de \
  --input-dir dataset \
  --output-dir dataset-prepared \
  --dataset-format ljspeech \
  --single-speaker \
  --sample-rate 22050
In this step the dataset is converted to the ljspeech format. Each voice sample is added to a jsonl (one json per line) file with the text, the location of the corresponding audio file and the phonemes of the text. The audio files are converted to .pt files, also a config.json is created which describes the dataset (quality, language, etc.)
For training it is suggested to finetune an existing model and to do so using docker.
Piper offers the model checkpoints at https://huggingface.co/datasets/rhasspy/piper-checkpoints/tree/main. I chose the de_DE > thorsten > high one.
The provided Dockerfile for training looks somewhat like this:
FROM nvcr.io/nvidia/pytorch:22.03-py3

RUN pip3 install \
    'pytorch-lightning~=1.7.0'

ENV NUMBA_CACHE_DIR=.numba_cache
In my case I had to upgrade the pytorch version from 22 to 24 because 22 uses an old cuda version that does not support my nvidia 4080 super gpu yet.
But upgrading pytorch means I can no longer install pytorch-lightning 1.7, I have to upgrade it to 2.0.
But upgrading pytorch lightning to 2.0 means all code that uses it is now affected by the breaking changes introduced in version 2.0, so I had to fix a few python files manually (with a little bit of debugging help by an LLM because - as you might have guessed by now - I do not enjoy writing code in python.)
Because the docker container uses a different linux version than the host I had to run ./build_monotonic_align.sh again. I created a train.sh to make things easier:
#!/usr/bin/env bash
set -eo pipefail

cd /app

./build_monotonic_align.sh

echo "start training"

python3 -m piper_train \
    --dataset-dir /app/dataset-prepared/ \
    --accelerator 'gpu' \
    --devices 1 \
    --batch-size 16 \
    --validation-split 0.0 \
    --num-test-examples 0 \
    --max_epochs 10000 \
    --resume_from_checkpoint /app/thorsten.ckpt \
    --checkpoint-epochs 1 \
    --precision 32 \
    --quality high
Now, finally we can start training
# make the script executable
chmod +x train.sh

# build training helper
docker build -t pipertrain .

# verify gpu is detected
docker run --rm --gpus all pipertrain nvidia-smi

# train
docker run --rm --gpus all --ipc=host --ulimit memlock=-1 --ulimit stack=67108864 --volume .:/app pipertrain /app/train.sh
Important details:
- the batch size is 16
- the bigger the batch size the better but this also requires more VRAM.
- The example batch size is 32, which apparently requires 24 GB of VRAM. Because of that, I chose a somewhat conservative 16 GB for 16 GB VRAM.
- I later tried out batch size 32 which also fit in my 16GB VRAM
- resume from checkpoint
- resume from an existing downloaded checkpoint, do not train from scratch
- quality is high
- this has to match the checkpoint quality
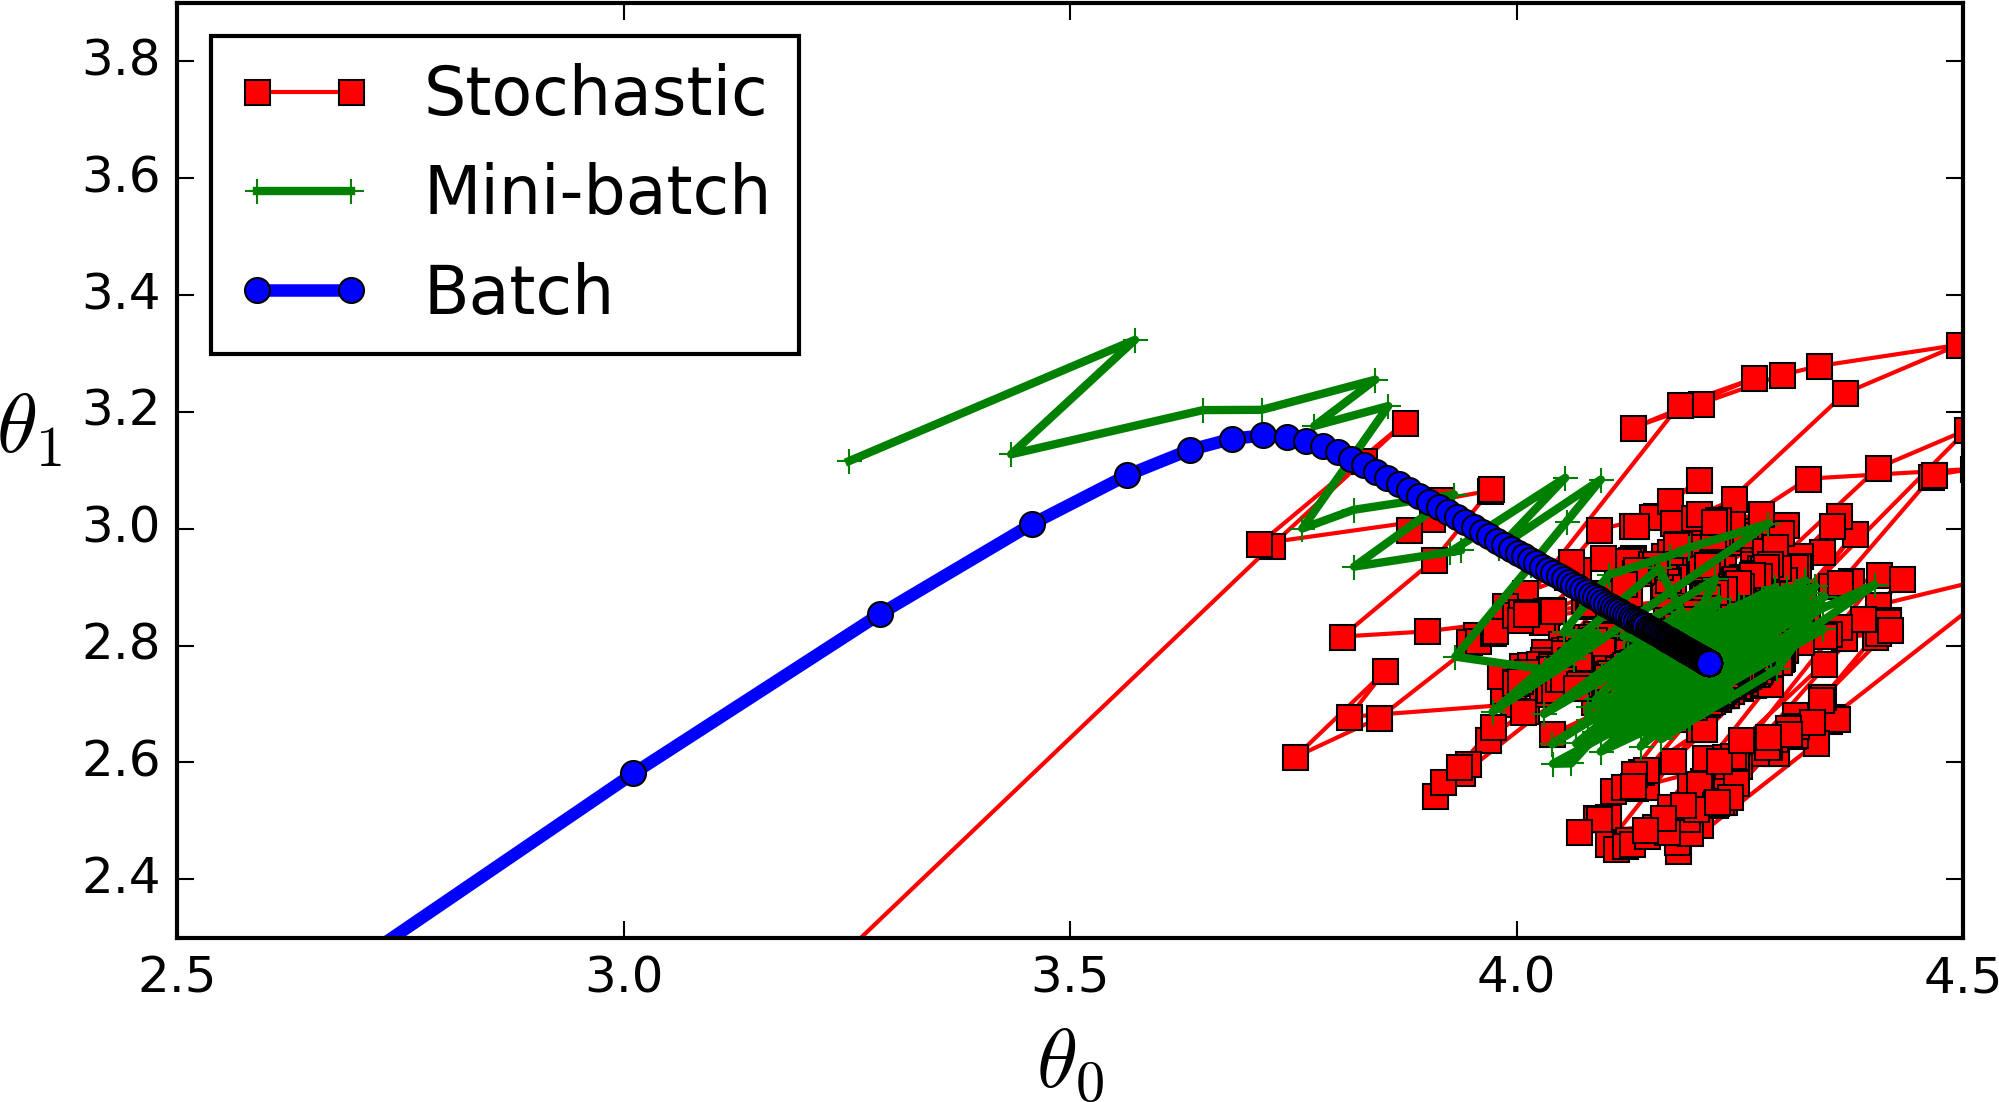
Quick detour about batch size
Because of RAM limitation you can not fit the whole dataset into memory so you split it up into batches. The smaller the batch the less accurate the estimate of the gradient will be. In the image you can see a small batch (green) fluctuates but eventually goes in the right direction compared to the blue "full dataset batch" gradient. The red one would be a batch size of 1 which changes direction even more often.
To watch the progress I wanted to start tensorboard in a second terminal window which, of course, throws a "module not found" error which can only be fixed by downgrading yet another package. This time pip install "setuptools<70"
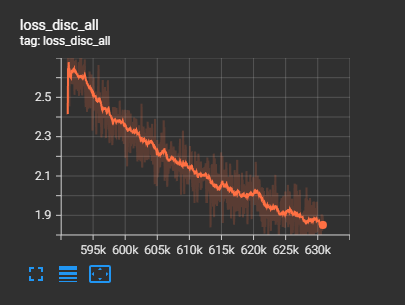
It opens a webinterface where the "scalars" tab is important. According to the tutorial
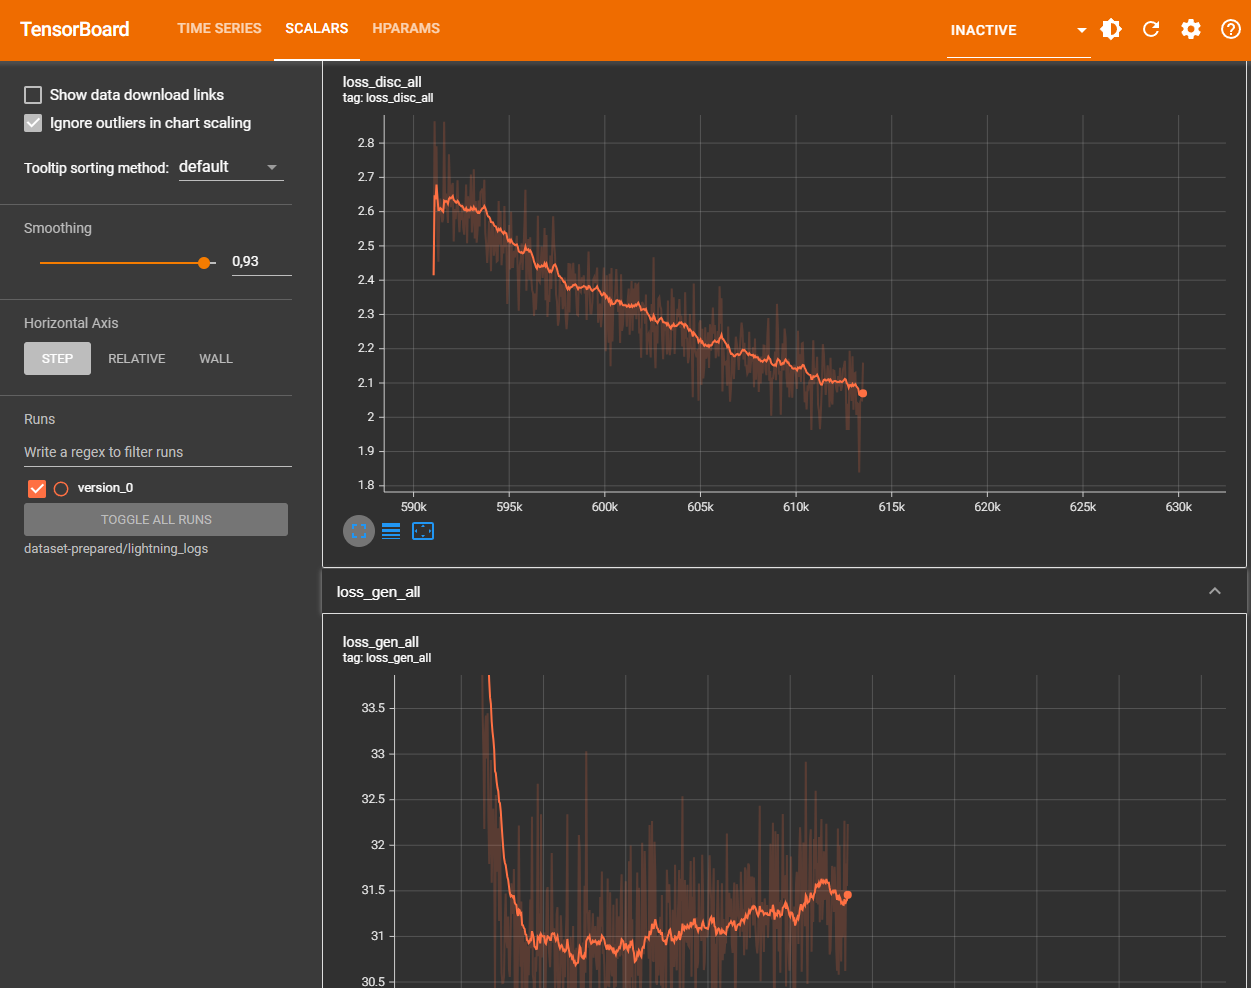
In general, the model is "done" when loss_disc_all levels off. We've found that 2000 epochs is usually good for models trained from scratch, and an additional 1000 epochs when fine-tuning.
In my first try I had a dataset with 367 voice samples, one epoch took about 8 seconds on my hardware so 1000 epochs are about 2-3 hours.
Testing
For this I created another helper script, test.sh
#!/usr/bin/env bash
set -eo pipefail

cd /app

CHECKPOINT=$(ls dataset-prepared/lightning_logs/version_*/checkpoints/*.ckpt | head -n 1)

if [ -z "$CHECKPOINT" ]; then
    echo "Error: No checkpoint file (.ckpt) found!"
    exit 1
fi

echo "Using Checkpoint: $CHECKPOINT"

mkdir -p test-output
rm test-output/*.wav

cat test.jsonl | \
    python3 -m piper_train.infer \
        --sample-rate 22050 \
        --checkpoint "$CHECKPOINT" \
        --output-dir "test-output"
docker run --rm --gpus all --ipc=host --ulimit memlock=-1 --ulimit stack=67108864 --volume .:/app pipertrain /app/test.sh
It uses a test.jsonl file I downloaded from https://github.com/rhasspy/piper/tree/master/etc/test_sentences and generates 10 audio files.
This allows me to check how good the latest checkpoint is.
Exporting
Finally I exported the model as onnx using yet another helper file, export.sh
#!/usr/bin/env bash
set -eo pipefail

cd /app

mkdir -p model-output

CHECKPOINT=$(ls dataset-prepared/lightning_logs/version_*/checkpoints/*.ckpt | head -n 1)

if [ -z "$CHECKPOINT" ]; then
    echo "Error: No checkpoint file (.ckpt) found!"
    exit 1
fi

echo "Using Checkpoint: $CHECKPOINT"

python3 -m piper_train.export_onnx \
    "$CHECKPOINT" \
    model-output/my-model.onnx

cp dataset-prepared/config.json model-output/my-model.onnx.json
docker run --rm --gpus all --ipc=host --ulimit memlock=-1 --ulimit stack=67108864 --volume .:/app pipertrain /app/export.sh
In the generated "my-model.onnx.json" I modified the "length_scale" from 1 to 1.3 which causes the voice to talk a bit slower.
Custom dataset
So how do you get a dataset for a custom voice? For my experiment I wanted to recreate the voice of K-2SO. In the movie though, the droid doesn't talk that much - or if he does, there is lots of background music or sound effects.

This is where voicebox comes to the rescue - I recorded a few seconds of clean audio from the movie and created a custom voice in voicebox (which is literally just uploading the audio file and hitting a "transcribe" button).
Now we can use it to generate audio for our dataset:
"normalerweise halten bestimmte wildtierarten bis in den märz hinein winterruhe." - text from the thorsten csv dataset, audio generated by voicebox
To automate this I wrote a script that uses the full metadata.csv from the thorsten voice dataset for the voice line texts and for each voice line, it generates an audio file via the local voicebox api.
Not every generated audio by voicebox is good though. Sometimes it is cut off at the end, has weird pronounciation or other artifacts. So after generating I pass the audio through the transcribe api of voicebox (awesome that it offers both!) which uses openai whisper.
I take the transcribed text and compare it with the original voice line. Comparing strings would be too strict though, so I only compare the phenomes of the two texts
let original = "Das ist ein Test";
let originalPhenomes = "das ɪst aɪn tˈɛst"

let transcribed = "Dasist ein Tes";
let transcribedPhenomes = "dazˈɪst aɪn tˈeːs"
For phenomizing I first tried out the phenomize npm package but it only supports english so I installed espeak-phenomizer
async function phonemize(text) {
    return new Promise((resolve, reject) => {
        const phonemizer = spawn('espeak-phonemizer', ['-v', 'de']);

        let output = '';
        let errorOutput = '';

        phonemizer.stdin.write(text);
        phonemizer.stdin.end();

        phonemizer.stdout.on('data', (data) => {
            output += data.toString();
        });

        phonemizer.stderr.on('data', (data) => {
            errorOutput += data.toString();
        });

        phonemizer.on('close', (code) => {
            if (code === 0) {
                resolve(output.trim());
            } else {
                reject(new Error(`process exit with code ${code}: ${errorOutput}`));
            }
        });
    });
}
The final script looks something like this:
const parser = fs.createReadStream(CSV_FILE).pipe(
    parse({
        delimiter: '|',
        from_line: 1
    })
);

for await (const record of parser) {
    const wavId = record[0];

    if (fs.existsSync(path.join(OUTPUT_DIR, "wavs", wavId + ".wav"))) continue;
    if (fs.existsSync(path.join(OUTPUT_DIR, "skipped-wavs", wavId + ".wav"))) continue;

    const textToProcess = record[1];

    if (!textToProcess) continue;

    let success = false;

    console.log("Attempt: " + textToProcess);

    for (let tr = 0; tr < 3; tr++) {
        let generation = await generateTTS(textToProcess, Date.now());
        await downloadAudio(generation.audio_url, "tmp.wav");
        await deleteTTS(generation.id);

        let transcribed = await transcribe("tmp.wav")

        //compare once with once without spaces between words
        let phonemizedInputNorm = await phonemize(normalizeText(generation.text));
        let phonemizedTTSNorm = await phonemize(normalizeText(transcribed.text));
        let phonemizedInput = await phonemize(normalizeText(generation.text, false));
        let phonemizedTTS = await phonemize(normalizeText(transcribed.text, false));

        let verified = phonemizedInput === phonemizedTTS || phonemizedInputNorm === phonemizedTTSNorm;

        if (!verified) {
            console.log("Failed, retry");
            continue;
        }

        //verified, save
        const dest = path.join(OUTPUT_DIR, "wavs", `${wavId}.wav`);
        fs.renameSync("tmp.wav", dest)

        const logEntry = `${wavId}|${generation.text.trim()}|${generation.text.trim()}\n`;
        fs.appendFileSync(LOG_FILE, logEntry);

        console.log("Success, saved as " + wavId);
        success = true;
        break;
    }

    if (!success) {
        const dest = path.join(OUTPUT_DIR, "skipped-wavs", `${wavId}.wav`);
        fs.writeFileSync(dest, "");
    }
}
I let it run for a few hours which generated 734 voice lines.
502 voice lines failed to generate even after 3 attempts.
The generated wav files are 24000 Hz, so I resampled them to the required 22050 using
for f in *.wav; do ffmpeg -i "$f" -ar 22050 "${f%.wav}_tmp.wav" && mv "${f%.wav}_tmp.wav" "$f"; doneCompared to the first test, training takes a bit longer per epoch.
This is "Victor jagt zwölf Boxkämpfer quer über den großen Sylter Deich." at 3113 epochs (3113 - 2665 = 448 epochs, 2h 41m, of finetuning)
Final result after training
I stopped the training at 3529 epochs because the tests started to gain audio artifacts.
The final .onnx file has a size of 108 MB. Generating 10 seconds of audio takes 700ms. This is great for running on CPU only, the quality of the generated audio is not amazing, but usable.
What seemed to have a negative impact on the quality is that k-2so talks quite fast.